Creating Content
Users with the Content Editor role can create and publish content directly from the administration interface. This page walks through the available content types and how to create each one.
Accessing the content creation page
Section titled “Accessing the content creation page”To create new content, use the Create menu in the top administration toolbar. Clicking it reveals links to every content type you have permission to add.
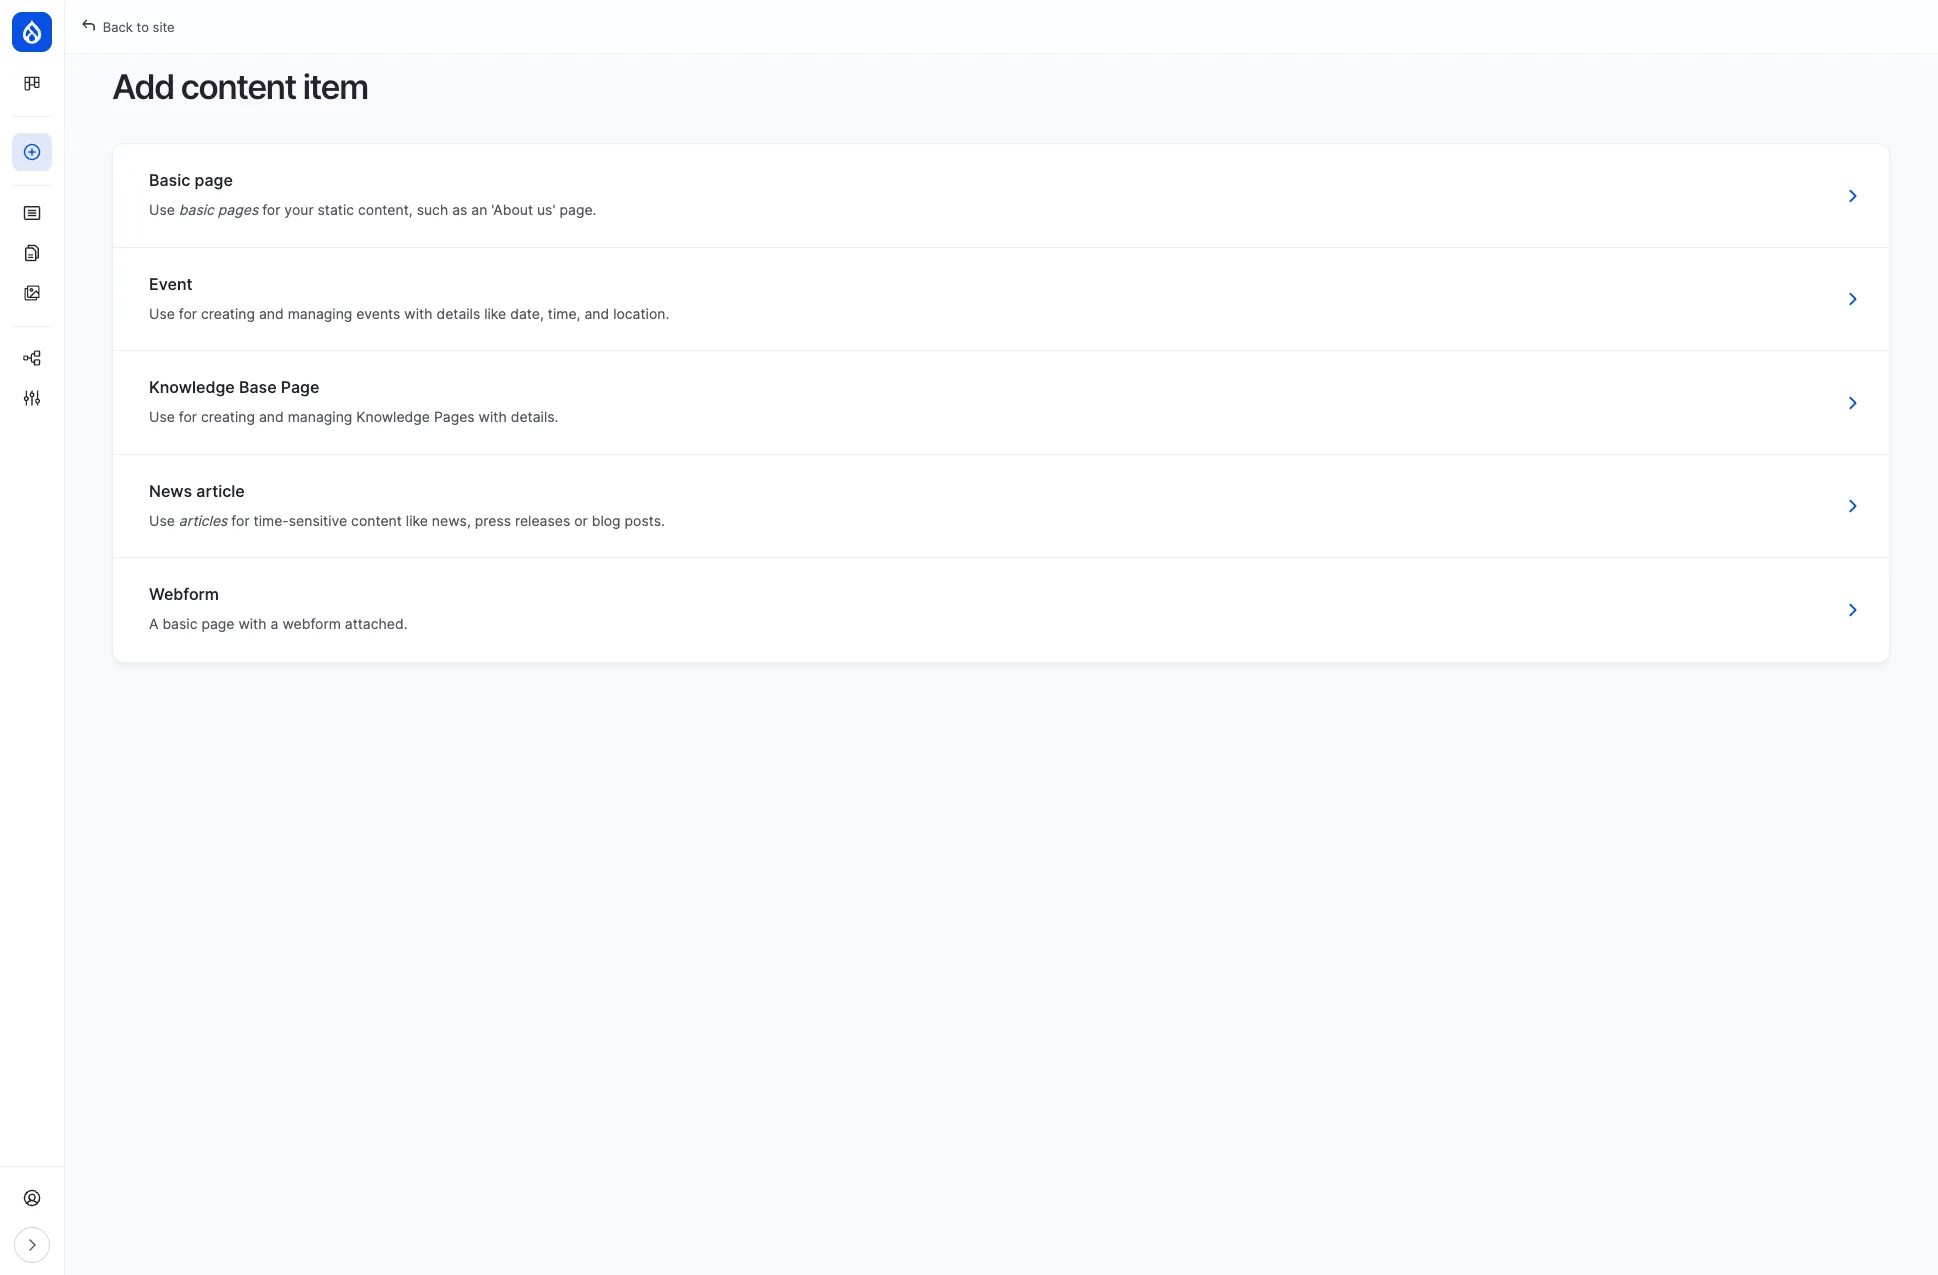
The available content types for a content editor are:
| Content type | Purpose |
|---|---|
| Basic page | Static informational pages (e.g. About Us, department pages, policies) |
| Event | Company events with date, time, location, and an optional map |
| Knowledge Base Page | Internal documentation organized in a hierarchical book structure |
| News article | Time-sensitive updates such as company news, press releases, or blog posts |
| Webform | Pages with an embedded form (surveys, feedback, applications) |
Creating a news article
Section titled “Creating a news article”Navigate to Create > News article to open the article form.
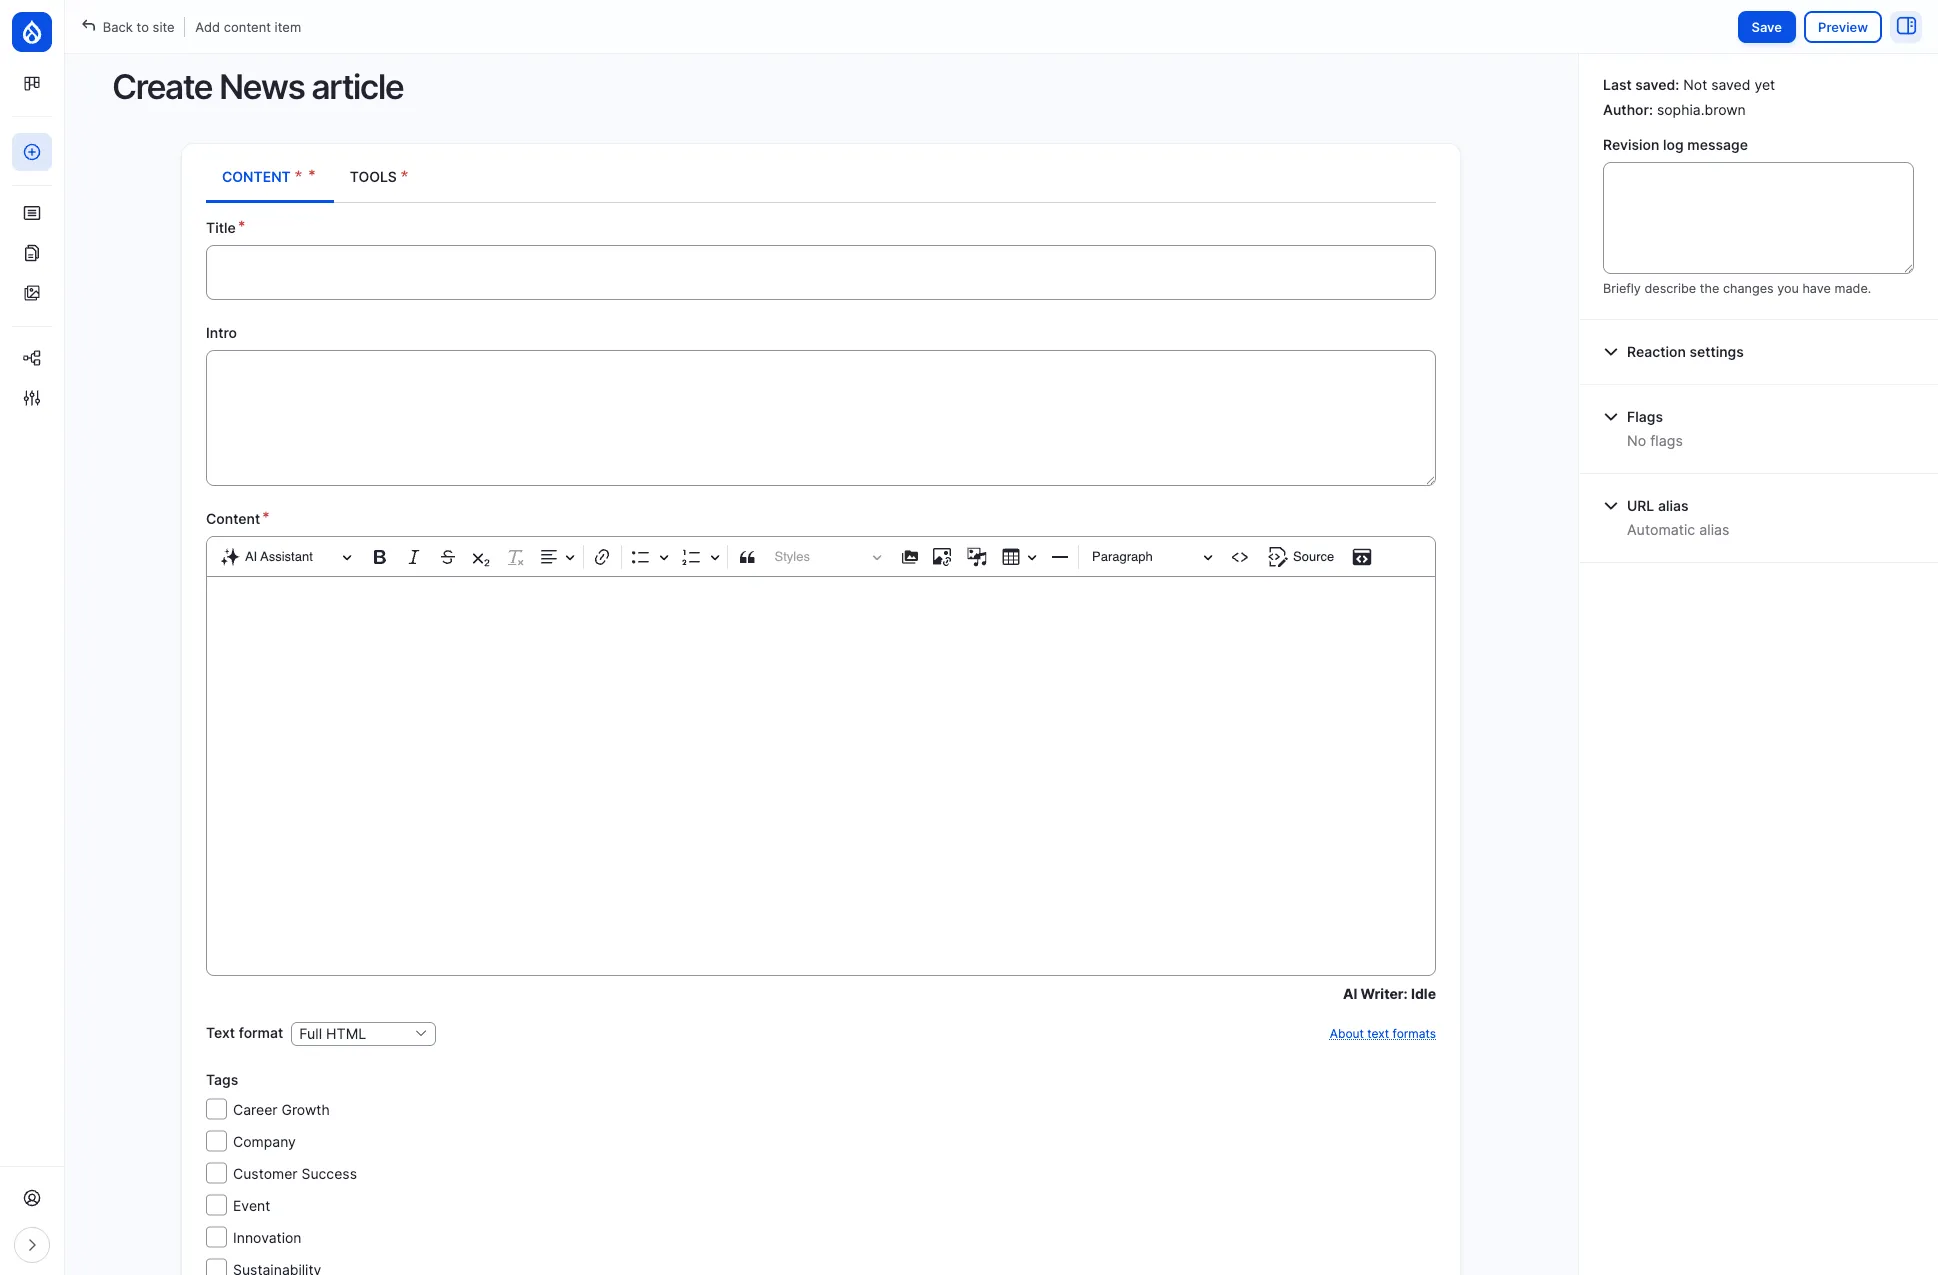
Fields
Section titled “Fields”| Field | Required | Description |
|---|---|---|
| Title | Yes | The headline displayed on the news listing and article page |
| Intro | No | A short lead paragraph shown in the listing teaser |
| Content | Yes | The main body, edited with a full rich-text editor (CKEditor). Supports bold, italic, lists, links, headings, images, tables, embedded media, and code blocks |
| Tags | No | Categorize the article (e.g. Company, Innovation, Team Spirit). Multiple tags can be selected |
| Background image | No | A hero/teaser image displayed at the top of the article and in listing cards. Upload or select from the media library |
| Related documents | No | Link to documents stored in the Document Management section |
Sidebar options
Section titled “Sidebar options”The right sidebar offers additional settings:
- Revision log message — describe what changed (useful when editing existing articles)
- Reaction settings — control whether reactions (likes) are enabled
- Flags — pre-set Bookmark or Read flags for the article
- URL alias — by default an alias is generated automatically from the title (e.g.
/news/my-article-title)
Click Save to publish the article immediately, or Preview to see how it will look before saving.
Creating an event
Section titled “Creating an event”Navigate to Create > Event to open the event form.
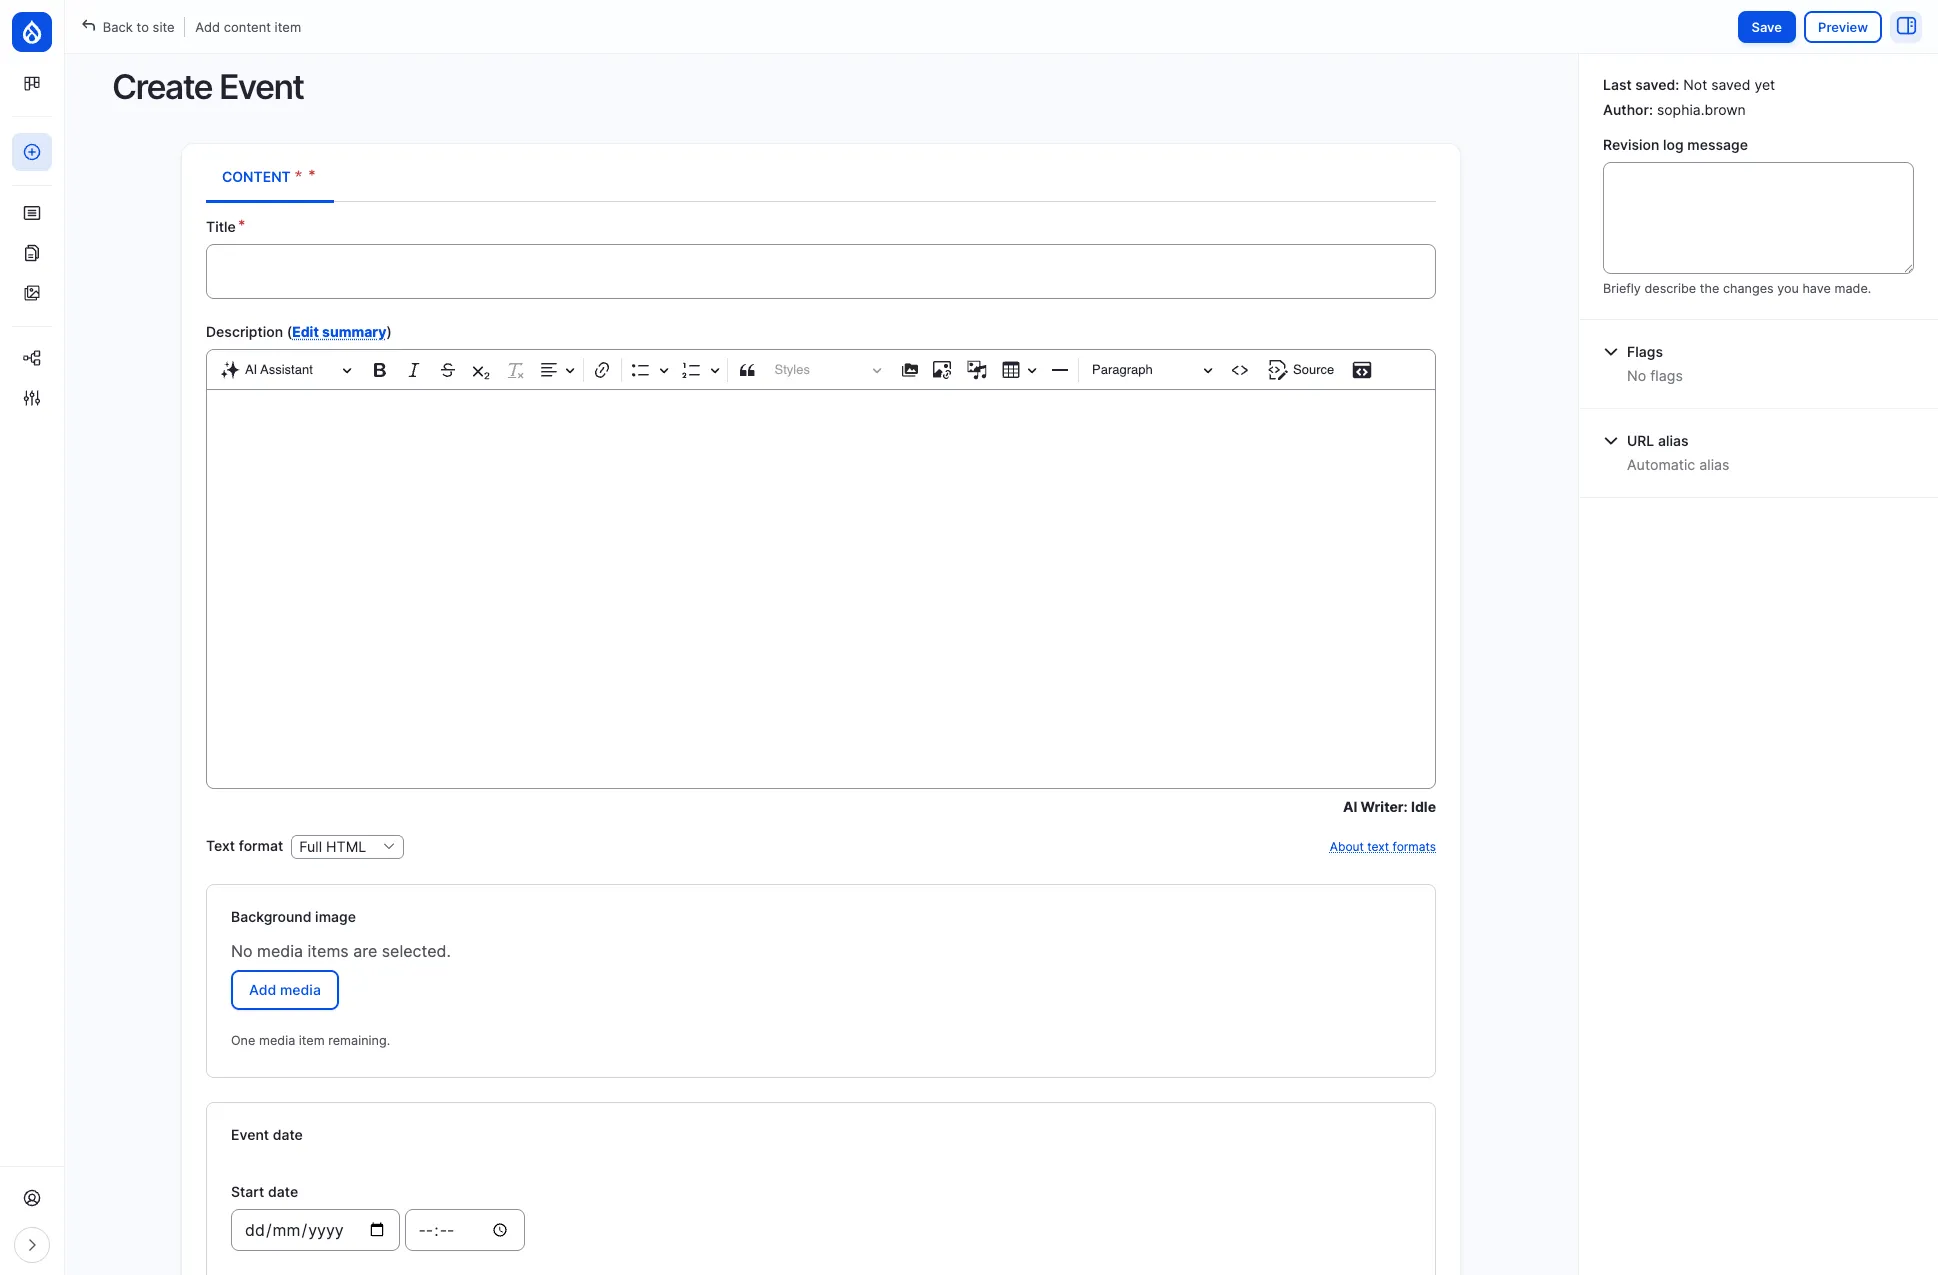
Fields
Section titled “Fields”| Field | Required | Description |
|---|---|---|
| Title | Yes | The name of the event |
| Description | No | Full event details, edited with the rich-text editor. Click Edit summary to provide a short teaser shown in the events listing |
| Background image | No | A header image for the event detail page |
| Start date | No | Date and time the event begins |
| End date | No | Date and time the event ends |
| Country | No | Select the country to enable the address fields |
| Location Map | No | An interactive map (Leaflet / OpenStreetMap) where you can pin the event venue. Zoom and pan to set the marker |
| Hide location | No | Check to hide the physical location from viewers |
| Event online | No | Mark the event as online-only and provide an Event Online Text (e.g. a video call link) |
Tips for events
Section titled “Tips for events”- If the event is in-person, select a Country first — this reveals additional address fields (city, street, postal code).
- Use the map to give attendees a precise location. They will see it on the event detail page.
- For hybrid events, fill in both the physical location and the Event Online Text.
Creating a knowledge base page
Section titled “Creating a knowledge base page”Navigate to Create > Knowledge Base Page to open the form.
Fields
Section titled “Fields”| Field | Required | Description |
|---|---|---|
| Title | Yes | The page title, displayed in both the article and the book sidebar navigation |
| Body | No | The main content, edited with the rich-text editor. Click Edit summary for a short description |
| Related content | No | Link to other existing nodes. Click Add existing node and start typing a title to search |
| Tags | No | Categorize the page (same tag vocabulary as news articles) |
| Related documents | No | Attach documents from the Document Management section |
Content and Access tabs
Section titled “Content and Access tabs”The Knowledge Base Page form has two tabs:
- CONTENT — all the fields described above
- ACCESS — control which groups (organizational units) can view this page. By default, knowledge base pages may be visible to all authenticated users, but editors can restrict access to specific groups
Adding pages to the book hierarchy
Section titled “Adding pages to the book hierarchy”After saving a Knowledge Base Page, you can organize it within the book structure:
- Edit the page and look for the Book outline section.
- Choose a parent page to nest it under, or select <top-level> to make it a root-level section.
- The page will then appear in the sidebar navigation of the Knowledge Base.
Creating a basic page
Section titled “Creating a basic page”Navigate to Create > Basic page. The form is similar to the Knowledge Base Page with a title and rich-text body. Basic pages are used for static, standalone content like department overviews, company policies, or informational landing pages.
Basic pages do not appear in the book hierarchy — they exist as independent pages accessible via their URL or linked from menus and other content.
Working with the rich-text editor
Section titled “Working with the rich-text editor”All content types use a CKEditor-powered rich-text editor with a full toolbar. Common formatting options include:
- Text formatting — Bold, Italic, Strikethrough, Subscript
- Structure — Headings (Paragraph, Heading 1–6), Block quotes, Horizontal lines
- Lists — Bulleted and Numbered lists
- Links — Insert links to internal pages or external URLs
- Media — Insert images (upload, URL, or media library), embed iframes
- Tables — Create and edit tables
- Code — Insert inline code or switch to Source view for raw HTML
- AI Assistant — Use the built-in AI writing assistant for drafting and editing help
Text format
Section titled “Text format”Below the editor you will find a Text format dropdown. In most cases, keep the default Full HTML for the widest formatting options. Other options like Basic HTML or Restricted HTML limit which HTML tags are allowed.
After saving
Section titled “After saving”Once you save content:
- It is immediately published and visible to users with appropriate access.
- A URL alias is auto-generated from the title (e.g. a news article titled “Q1 Results” becomes
/news/q1-results). - The content appears in relevant listing pages (news feed, events calendar, knowledge base sidebar).
- Search indexes are updated so the content becomes discoverable via the site-wide search.